Extending the life of your asphalt surfaces is crucial not only to improve the look of the area but also to save you money.
In order to pave a 3000 square foot parking lot you are going to spend approximately $10,500 ($3.50 per square foot). In addition to this cost you will have to factor in another $10,500 every 10-15 years to have the parking lot repaved. With asphalt maintenance and sealcoating you are able to extend the life of your parking lot by 200% (25-30 years).
The care and maintenance you put into your parking lots, roadways, driveways, and other paved surfaces will eliminate costly asphalt replacement as well as leave your exterior looking beautiful and well kept, adding significant value to your property.
Throughout this course you will learn how to properly maintain and take care of your asphalt surfaces. We will guide you through a step-by-step process and give you all the information and free expert advice you will need to keep your asphalt surfaces looking healthy and new.
Preparation and planning is the key to success in most things in life... and asphalt maintenance and sealcoating are no exceptions.
Preparation
1. Clearing Weeds
The first step in sealcoating preparation is clearing weeds from your asphalt surface. This is one of the most important parts of the preparation process. You want to make sure you are working with a completely clean, weed free area in order to get the best sealcoating results.
Use a screwdriver, the chipper part of a Ryno crack brush, ice chipper, or a lawn edging machine to dig out and scrape off all grass and weeds that may be encroaching on the driveway or inhabiting any cracks. It is critically important to try and get all weeds, including roots, off and out of the asphalt surface being repaired and maintained.
If you are able to wait for 7 to 10 days before sealcoating the driveway, we recommend buying weed killer from your local hardware store and spraying all the weeds and roots. You will then have the asphalt surface completely weed and grass free and there is nothing better than having a completely clean asphalt surface to work on to ensure a super quality sealcoating job.
Use a Ryno crack brush or stiff broom to remove the dirt and debris off the driveway. If you have an electric or gas powered blower you can use that as well – you will find that you will save time with the “Blower.” You can rent blowers at equipment rental shops or buy them directly from us. The cleaner, the better.
2. Remove Loose Asphalt:
Remove loose material from the edges of small potholes and large cracks. Use a Ryno crack brush, a large screwdriver, wire brush, water from a hose or a power blower to clean the dust and debris off the surface. It is important to wear protective eye wear when doing this as you may get dust and dirt in your eyes!
Carefully inspect your asphalt surface. If patching or filling large cracks is required, plan on making the repairs early in the day so they have adequate time to cure before applying the sealer.
3. Scrub or Pressure Wash Surface:
Once you have removed all of the loose asphalt and debris off of the surface, scrub the entire area with a stiff broom and remove all of the remaining dirt and oil. Pay particular attention to areas to be crack-filled or patched.
Oil stains must be removed with an oil stain remover. If you do not remove the grease and oil stains before sealing the surface, the oil or grease will eventually eat its way back up through the new sealcoat or repaired area.
You can purchase oil stain remover from your local hardware store or directly from Asphalt Kingdom. Using a rag, cloth or broom, apply the degreaser directly to the stain. Scrub the degreaser onto the stain and then let sit for five to ten minutes. Rinse off with water. Throw a light coat of dust on the removed stain and move it around with a broom. This will fade the area out and prepare it for sealing.
It is important to determine if the stains have significantly damaged the asphalt. In order to do this, take a screwdriver and press on the stain. If the screwdriver sinks into the oil stain it means that the asphalt has been burnt from the acidic properties in the oil and will need to be replaced.
To remove the damaged asphalt, you must heat the oil with a blow torch and lightly scrape the stained asphalt with a shovel. This hole will need to then be replaced with a cold patch that you can buy at the local hardware store or by calling and speaking with us about our bags of cold patch (1-866-399-5562). Directions on how to patch a hole and crack filling is discussed in Part 2.
4. Use Water Pressure:
If you are completing this sealing job by hand, using a roller, squeegee or brush, then it's important to hose the area down with as much water pressure as possible. If you are using one of our sealcoating spray systems, there is no need to wash the asphalt area down with water as the sealer is applied under immense pressure.
A pressure washer is optimal and is worth renting or borrowing, especially if you have other exterior cleaning chores to do. Work from the center of the building side of the asphalt surface out to the sides or from one side to another.
Start uphill, working down, so the dirt and debris does not wash back onto the cleaned area.
5. Vacuum Debris:
Use a shop vacuum to remove all remaining dirt from the cracks to be filled. These must be very clean and dry before filling. Do not use compressed air at this point or the dirt will blow out of the cracks and onto your just-cleaned asphalt surface.
Asphalt is not 'green' as a rule but for the sake of the environment and for easier application and cleanup, we suggest using an asphalt sealer that is water based.
You can contact us directly for our pricelist on the tools you will need to get this asphalt maintenance job done properly. We supply all asphalt maintenance products, tools and equipment shipped right to your door so do not hesitate to ask.
Tools Needed:
Here is a list of the tools that you will need to get the job done properly:
Remember:
- Check the weather forecast to allow adequate time to complete the job. We suggest you check a two-day weather forecast and avoid cold weather (below 50°F) or rain.
- If you plan on sealing your surface on the same day you have filled or sealed any cracks, make sure to allow the asphalt area to be warmed by the sun before applying the sealcoat.
- Wear work clothes and boots. This is asphalt – you will get dirty!
|
 |
 |
 |
The Billy Goat Grazor Gas powered Crack Cleaning system is invaluable for the sealcoating contractor who has to remove vegetation and other debris from cracks and crevices before laying down crackfiller and applying sealant to the asphalt surface.
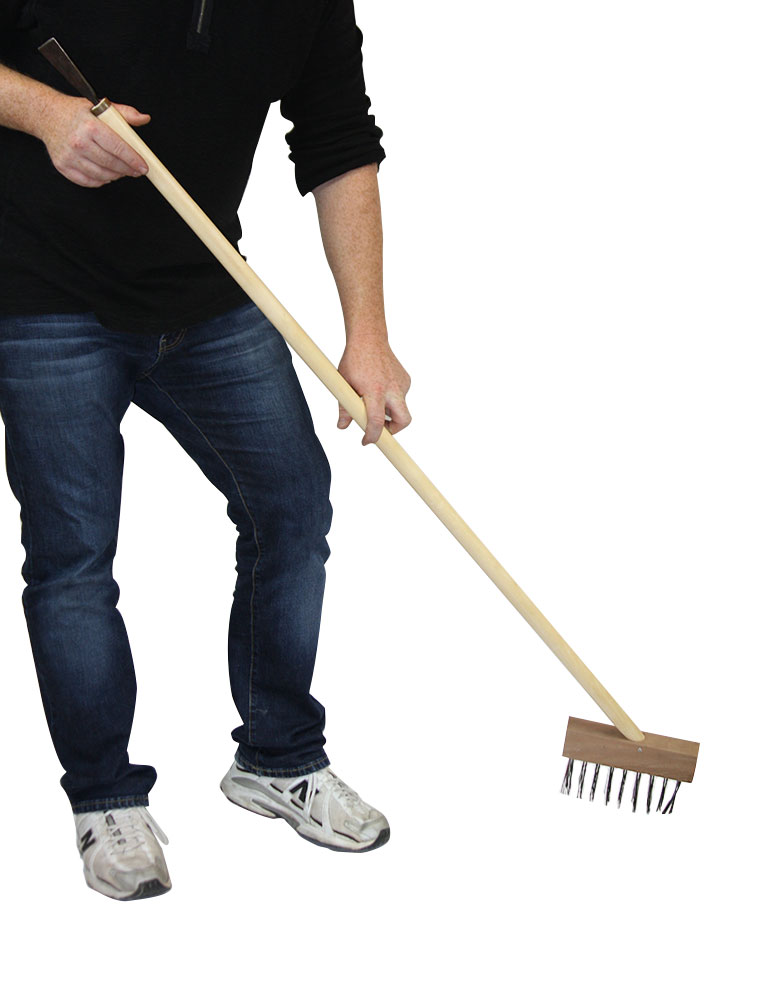
The Ryno Crack Brush is a 2-in-1 tool that lets you chisel out vegetation and loose asphalt with one end. The other end has a stiff broom to sweep away dust and dirt.
|
 |
| The A.K. Universal Cleanser Degreaser is perfect for use on asphalt or concrete driveways, roadways, and parking lots. It is a powerful degreaser for large jobs. This degreaser leaves no surface residue or white streaks and leaves a slip free surface eliminating safety hazards. |
 Year-round cold asphalt patch for patching holes in asphalt. You can patch at anytime of the year, no matter how cold it is. Cures extremely solid within 3 to 4 hours.
 |
 |
| The Billy Goat Blower is a gas powered blower that is used to clean thousands of square feet in just seconds. It is an all around tool used for cleaning out cracks and crevices as well as blowing debris off of your asphalt surface. |
Sign up for the Asphalt Kindom Newsletter!
|
| |
|
|