|
|
 |
 Part 3: Types of Line Striping
|
|
|
Parking lot painting may be as easy as painting a couple of straight lines to dividing a private lot. On the other hand, you may have to create a unique, custom, curved or angled parking design to suit your client’s parking needs.
Worry not, as we will discuss each type of line painting method in more detail below.
|
|
|
1. Tracing
Tracing is the easiest, quickest and most profitable parking lot painting job out there. Your goal is to refresh the current lines, correct any previous mistakes and leave it looking crisp and professional.
In order to trace you need to begin with your Job Preparation routine, discussed in Section #2: Surface Preparation. Remember:
- Blow, brush or sweep off debris
- Make your T-markings
- Chalk your vertical lines
Take your Line Striping Machine and line it up with the spray gun pointing on your fresh chalk lines. A laser guide can help you line up your striper with the lines you need to repaint. Begin striping, following your chalk line pattern. Remember to line your spray gun on the appropriate side of the chalk line, so you are not pushing your machine through wet paint when back tracking.
2. Creating New Layout and Pattern for Parking Lot Painting
 This format for many people is also an easy task. It is a clean surface to make a well spaced, free flowing parking area. This type of job is exactly like tracing without the existing pattern. Get out your measuring tape and measure the surface you are going to stripe. Mark your T’s and snap your lines. This format for many people is also an easy task. It is a clean surface to make a well spaced, free flowing parking area. This type of job is exactly like tracing without the existing pattern. Get out your measuring tape and measure the surface you are going to stripe. Mark your T’s and snap your lines.
Tip: You can also use a parking lot layout tool to make your layout job easier.
Helpful Hints:
- Take your 300 ft. measuring tape
- Measure out your lot
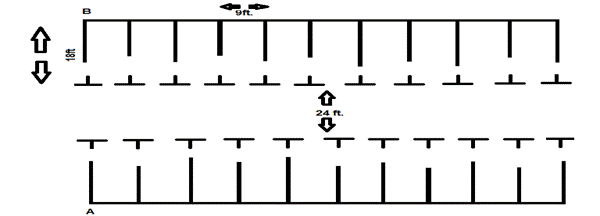
- Divide your lot into 18ft. (length) by 9ft. (wide) stalls
KEEP IN MIND: You MUST leave 24ft. between the back of each stall for the drive lane.
To Start Parking Lot Painting:
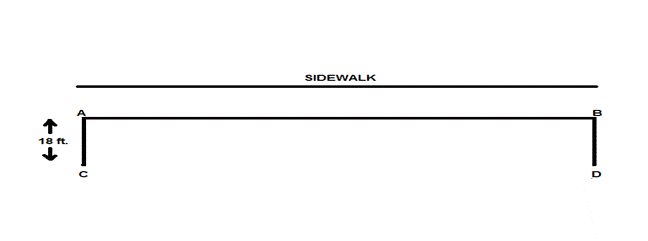
- Pick a landmark (i.e. Sidewalk)
- Take your chalk string and measure from Point A to Point B (you are going parallel to the sidewalk)
- Measure the length (Point A to Point B) and make sure that you only chalk a length that can be equally divided by 9ft.
- Now take your chalk string and measure 18ft. from Point A to Point C (you are now going perpendicular to the sidewalk).
- Go to Point B and measure from Point B to Point D 18ft.
- Now you Mark your T’s.
- Take your measuring tape, one end at Point C, one at Point D.
- Walk back towards Point C, every 9ft. make your T mark using your railway chalk.
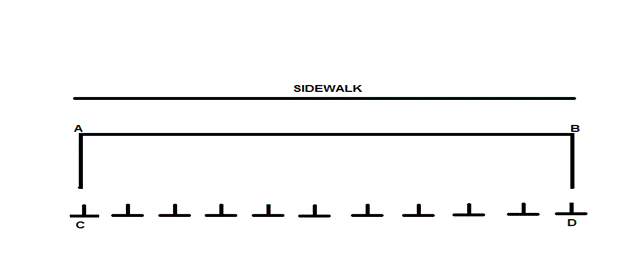
- Finish making your chalk lines by lining up your T marks with the line parallel to the sidewalk.
- Use your Chalk String Line to do this.
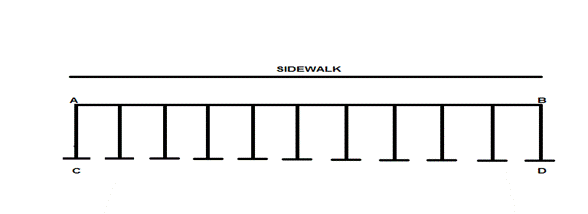
Your parking lot should now look like a grid; all lines are in chalk at this point. Your next step in parking lot painting is to paint over your chalk lines with your Line Striping Machine.
Align your line striping machine up at Point A and stripe to Point B. When you get to point B start striping your inside lines. Point B-D first, then move across your grid striping the whole way until you are back at Point A.
As mentioned above, if you have a large lot, do your T- Markings and your Chalk grid exactly the same way as discussed, just make sure you leave 24ft. in between each section of stalls for the driving lane.
3. Angled Parking
There are three common angles in parking lot painting you will be asked to blueprint: 45 degree angle, 60 degree angle and 75 degree angle.
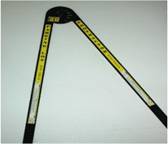
These angles can be easily done with your Parking Lot Protractor (pictured right). Simply begin the same way as you did above.
- Find a landmark (i.e. Sidewalk)
- Chalk from Point A to Point B
- Chalk from Point A to Point C
- Take your parking lot protractor, place one end 9ft. out from Point C and the other side at your desired angle.
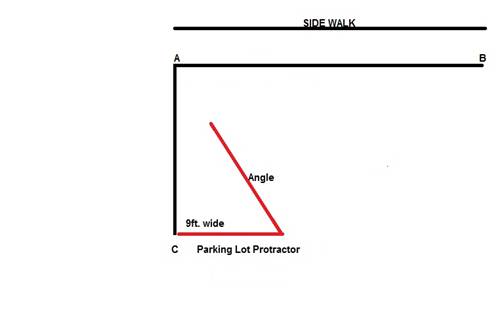
- Using your Chalk String Line, line it up with your protractor and snap it, showing your new angled line.
- Continue down the grid, measuring on a perpendicular angle ensuring that the width between your STALL lines is 9ft (this does not mean your AB line).
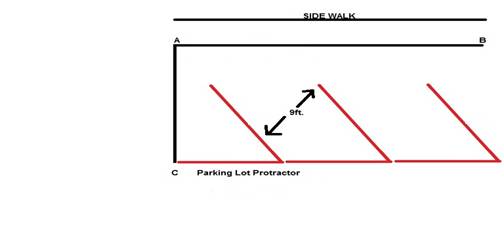
NOTE: Angled parking reduces the amount of stalls available, BUT can be handy in certain cases, where inadequate or lack of space is an issue as you are able to squeeze in one more row of angled parking than straight parking.
4. Stencils for Parking Lot Painting
Stencilling is very straightforward. It involves placing a stencil in the desired location and painting over the stencil, leaving only the stencil design once the stencil is removed. Most common types of stencils are:
- Handicap Parking Space
- Lettering
- Numbering
- Arrows
- Reserved Parking Space
In Titan's Parking Lot Painting Stencil Kit you get a set of all of the following stencils:
- Handicap Symbol
- Straight and curved arrows
- Numbers 0-9
- "Visitors"
- "No Parking"
- "Fire Lane"
- "Reserved"
5. In Case of Accidents when Parking Lot Painting
As with many things in life, mistakes happen. Not to worry, Asphalt Kingdom recommends having a 5 Gallon bucket of Commercial Grade Asphalt Sealer as well as a hand roller on all jobs. This will come in handy to cover up any errors or line stripe mistakes made while parking lot painting.
Simply dip your hand roller (preferably 4 inches wide, the same width as your lines) into the sealer and seal over top of your error. Once the sealer has dried you can re-stripe this area.
|
|
|
| |
Contents Copyright © LIL. All Rights Reserved |
|
|
|